TL;DR
Water in a basement after rain almost always enters through one of six specific points: the cove joint where the wall meets the floor, cracks in the foundation wall, window wells, the wall-to-footing joint, pipe penetrations, or the floor itself. Where the water appears tells you exactly what caused it. Fixing the right entry point costs $300 to $3,000 for most homes. Fixing the wrong one, or painting over it with waterproof paint, is money wasted. Start by identifying the specific entry point during or immediately after the next rain event. That single observation determines every repair decision that follows.
You went downstairs after the storm and found water. Maybe it was a puddle near the wall. Maybe the carpet felt damp underfoot. Maybe there was an inch of standing water across the floor. The amount does not matter as much as the location. Where water appears in a basement after rain is not random. It is a precise signal about exactly where your foundation defense has failed and exactly what needs to be fixed.
Most basement water problems are solved by the wrong repair because most homeowners never identify the specific entry point. They apply waterproof paint to the walls, get a dehumidifier, or install a full interior drainage system when the actual problem was a clogged downspout extension 10 feet away from the house. Conversely, some homeowners spend years regrading their yard and cleaning their gutters when the actual problem is hydrostatic pressure from a high water table that no amount of surface drainage will solve.
This guide gives you the diagnostic framework to identify your specific entry point and match it to the right fix.
The Entry Point Rule
The core principle for diagnosing basement water after rain is The Entry Point Rule: the location where water appears tells you where it entered, and where it entered tells you what caused it. Every repair decision follows from that single observation.
Before spending anything on waterproofing, you need to watch what happens during or immediately after a rain event. This means going into the basement while it is raining, or within the first 30 minutes after a heavy rain stops, with a flashlight, and looking at the walls, the cove joint, the floor, and around every window and pipe penetration.
Mark what you find. A piece of chalk on the wall or tape on the floor at the wet spot takes 10 seconds and gives you the diagnostic data every contractor will ask for.
Do not repair a basement water problem before identifying the entry point.
Waterproof paint applied to a wall that is not the entry point does nothing. An interior drainage system installed when the real problem is poor surface drainage manages the symptom and ignores the cause. Identify the specific location where water enters during or immediately after rain before calling any contractor or purchasing any materials.
Entry Point Diagnosis Table
| Where Water Appears | Entry Point | Root Cause | DIY or Pro | Typical Fix Cost |
|---|---|---|---|---|
| Along base of wall where it meets the floor | Cove joint | Hydrostatic pressure from saturated soil | Pro | $3,000 to $10,000 interior drainage |
| Seeping through wall surface, no visible crack | Wall pores (seepage) | Hydrostatic pressure or poor exterior waterproofing | Pro | $5,000 to $15,000 exterior waterproofing |
| Visible vertical crack in wall with water trail | Foundation wall crack | Settlement crack or shrinkage crack | DIY if hairline, Pro if wide | $500 to $1,500 crack injection |
| Horizontal crack in block or poured wall | Structural wall crack | Lateral soil pressure | Pro immediately | $2,000 to $8,000 structural repair |
| Water under window on one side only | Window well | Clogged well drain or no drain | DIY | $100 to $400 |
| Water around pipe coming through wall | Pipe penetration | Failed pipe boot or sealant | DIY | $50 to $200 |
| Water coming up through floor cracks | Floor crack | Hydrostatic pressure from below | Pro | $2,000 to $6,000 |
| Water in center of floor, no wall contact | Floor drain backup or window well overflow | Surface drainage overwhelmed | DIY first | $0 to $500 |
| Water only after very heavy rain, not moderate rain | Multiple possible entry points overwhelmed | Surface drainage failure | DIY first | $200 to $1,500 |
| Water only on one wall, not others | Single wall seepage | Specific exterior drainage failure at that wall | DIY first | $200 to $2,000 |
Step 1: Check Surface Drainage First
Before assuming a foundation problem, rule out surface drainage failures. These are responsible for the majority of basement water problems and are the cheapest to fix.
Gutters and downspouts: A clogged gutter overflows and deposits roof runoff directly against the foundation wall. A downspout that discharges within 2 feet of the foundation creates a concentrated water source at the exact point where your basement walls are most vulnerable. Walk the perimeter during a rain event and watch where downspouts discharge. They should extend at least 4 to 6 feet from the foundation. In clay-heavy soils, 10 feet is better.
Grading: The soil around the foundation should slope away from the house at a minimum of 6 inches of drop over the first 10 feet. Soil that has settled flat or slopes back toward the foundation creates a bathtub effect during rain events, saturating the soil against the wall and raising hydrostatic pressure. Correcting grade with topsoil is a $200 to $500 DIY project that eliminates this pressure source entirely.
Window wells: A window well without a drain or gravel base fills with water during rain and creates a direct pressure source against the window frame and surrounding wall. Each well should have 8 to 12 inches of gravel at the base and either a drain connected to the drainage system or a fitted cover that keeps direct rainfall out.
If fixing surface drainage stops the water: The foundation itself was never the problem. This is the most common outcome for homes that only leak after heavy rain but stay dry after moderate rain.
If fixing surface drainage does not stop the water: The problem is hydrostatic pressure, a foundation crack, or a failed waterproofing membrane. Continue to Step 2.
Step 2: Identify the Specific Entry Point
With surface drainage addressed or ruled out, identify exactly where water enters the basement.
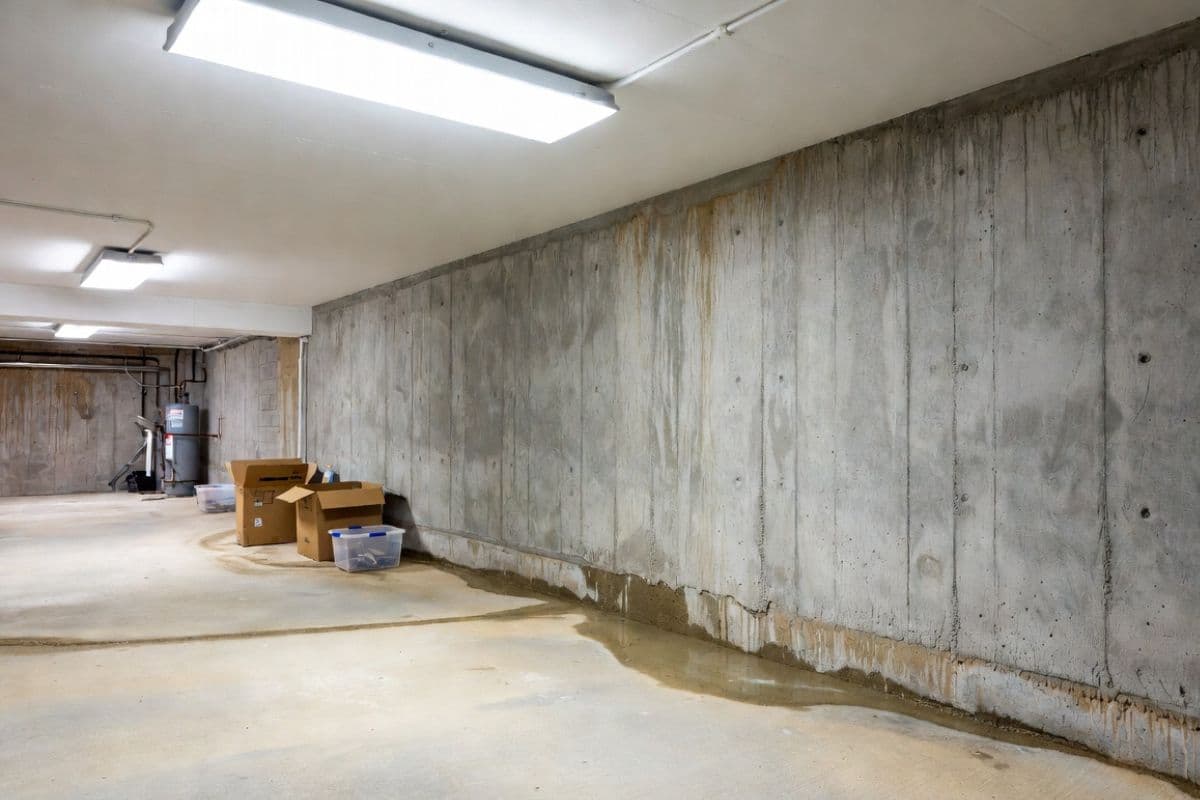
Cove joint seepage: The cove joint is where the foundation wall meets the floor slab. In most basement construction, this joint is not sealed at the time of construction. The wall and floor are poured separately and the joint between them is a natural gap. When hydrostatic pressure builds in the soil outside, water finds this joint and seeps along the base of the wall. The water appears as a continuous wet line along one or more walls, not as a drip from a specific point.
Cove joint seepage indicates hydrostatic pressure. Surface drainage improvements reduce the pressure but often do not eliminate it in homes with high water tables or clay soils that retain moisture for days after rain. The definitive solution is an interior drainage system, which is a perimeter channel cut at the cove joint that intercepts water and directs it to a sump pit. See our interior basement drainage systems guide for how these systems work and what they cost.
Foundation wall cracks: Vertical cracks in poured concrete walls are extremely common and usually result from normal concrete shrinkage during curing or minor settlement. They become a problem when they extend through the full thickness of the wall and allow water passage. A crack with a water trail running down the wall below it is a through-wall crack that needs sealing.
Hairline cracks under 1/8 inch wide can be sealed with hydraulic cement or polyurethane crack injection as a DIY repair. Cracks wider than 1/4 inch, any horizontal crack, or any crack showing movement (different width top vs bottom) should be evaluated by a structural engineer before any repair is attempted. See our foundation crack repair cost guide for cost details by crack type.
Horizontal cracks: A horizontal crack in a block or poured concrete wall indicates lateral pressure from the soil outside. This is a structural issue, not just a waterproofing issue. The wall is being pushed inward by the weight of saturated soil. Do not attempt DIY repair. A structural engineer should evaluate before any contractor begins work.
Window well seepage: Water entering around a basement window after rain almost always comes from the window well, not from groundwater pressure. Confirm by checking whether the well is holding water during rain. The fix is drainage: either a gravel base to allow passive drainage, a drain pipe connected to the drainage system, or a cover that prevents direct rainfall from entering the well.
Pipe penetrations: Every pipe, conduit, or cable that passes through the foundation wall is a potential entry point. The sealant around these penetrations fails over time. Look for water trails originating from a specific pipe location rather than running down the full wall. Hydraulic cement or specialized pipe boot products seal these penetrations as a DIY repair.
Step 3: Match the Fix to the Cause
Surface drainage fixes (DIY, $0 to $1,500)
- Clean gutters and extend downspouts 4 to 10 feet from foundation
- Regrade soil to slope away from foundation
- Install window well covers or drainage
- Fill low spots in the yard that direct water toward the foundation
Crack injection ($500 to $1,500 per crack, professional)
The most effective repair for through-wall cracks is polyurethane or epoxy injection performed from the interior. A contractor drills ports along the crack, injects expanding foam or resin under pressure, and caps the ports. The repair seals the crack from the inside out and is flexible enough to tolerate minor future movement. This is not a DIY repair for cracks that are actively leaking. See our complete basement waterproofing guide for more on crack repair methods.
Window well repair ($100 to $400, DIY)
Add 8 to 12 inches of gravel to the well base, install a drain if not present, and fit a cover rated for the well size. This eliminates nearly all window well seepage.
Interior drainage system ($3,000 to $10,000, professional)
The correct solution for cove joint seepage and hydrostatic pressure from below. A perimeter channel is cut at the base of the wall, a perforated drain pipe is installed, and the system drains to a sump pit. A sump pump then removes the water. This system does not waterproof the wall. It manages water that has already entered the foundation and removes it before it spreads. See our sump pump guide for pump selection and sizing. Recurring water during storms often points to an undersized or failing sump pump. If replacement is the right call, use our sump pump replacement cost guide for a planning estimate.
Exterior waterproofing ($5,000 to $15,000, professional)
The most permanent solution for wall seepage and hydrostatic pressure. Excavation around the foundation exposes the exterior wall, a waterproof membrane is applied, drainage board is installed, and the excavation is backfilled with drainage aggregate. Exterior waterproofing addresses the source of water pressure rather than managing it after entry. The cost and disruption are significant. This is appropriate for severe or widespread seepage, not isolated cracks or cove joint issues.
What Waterproof Paint Actually Does
Every hardware store sells waterproof basement paint or masonry sealer. It is heavily marketed as a basement water solution. Here is what it actually does:
Waterproof paint seals the pores of concrete and masonry against vapor transmission and minor condensation. It is appropriate for reducing humidity in a basement that feels damp without visible water intrusion. It is not appropriate for any situation where liquid water is entering through a crack, the cove joint, or hydrostatic pressure through the wall.
When applied over an active leak, waterproof paint delays the water briefly, builds pressure behind the coating, and eventually delaminates, peeling off the wall in sheets with water behind it. If you see peeling paint on a basement wall, that is a sign of past or ongoing water intrusion, not a paint failure.
Use waterproof paint as a finishing coat after the water problem is fixed, not as the fix itself.
Repair Cost Summary
| Repair Type | DIY Cost | Professional Cost | Best For |
|---|---|---|---|
| Gutter cleaning and downspout extension | $0 to $150 | $150 to $400 | All homes as first step |
| Regrading around foundation | $200 to $500 | $500 to $2,000 | Flat or negative grade |
| Window well drainage and cover | $50 to $200 | $200 to $500 | Window well seepage |
| Pipe penetration sealing | $20 to $75 | $150 to $300 | Pipe entry seepage |
| Hairline crack DIY sealing | $30 to $80 | N/A | Cracks under 1/8 inch |
| Crack injection (professional) | N/A | $500 to $1,500 per crack | Through-wall cracks |
| Interior drainage system | N/A | $3,000 to $10,000 | Cove joint, hydrostatic pressure |
| Exterior waterproofing | N/A | $5,000 to $15,000 | Severe wall seepage |
| Structural wall repair | N/A | $2,000 to $8,000 | Horizontal cracks, bowing walls |
Frequently Asked Questions
Why does my basement only leak after heavy rain but not after normal rain?
A basement that only leaks after heavy rain but stays dry after moderate rain almost always has a surface drainage problem rather than a foundation failure. During moderate rain, gutters and downspouts handle the roof runoff and the soil absorbs what reaches the ground. During heavy rain, gutters overflow, downspouts cannot handle the volume, and the soil saturates faster than it drains. The excess water pools against the foundation and finds the weakest entry point. Start by cleaning gutters, extending downspouts, and correcting any negative grade before assuming the foundation needs repair.
How do I find where water is entering my basement?
Go into the basement during rain or within 30 minutes after rain stops with a flashlight. Look at the walls at floor level, the cove joint where wall meets floor, around every window, and around every pipe penetration. Water leaves a trail: a wet streak on the wall, a damp line along the floor, or a puddle in a specific location. Mark exactly where you see moisture with chalk or tape. That specific location is the entry point and determines the correct repair.
Is water in the basement after rain covered by homeowners insurance?
Standard homeowners insurance policies do not cover basement water intrusion from surface flooding or groundwater seepage. These events are considered gradual water damage or flooding, neither of which is covered under standard policies. Flood insurance through the National Flood Insurance Program covers flooding from external water sources. Sump pump backup riders, available as policy add-ons, cover water damage caused by sump pump failure. Review your policy and ask your insurer specifically about water backup coverage if you have a sump pump.
Can I fix a basement water problem myself?
It depends entirely on the entry point. Fixing surface drainage issues including gutter cleaning, downspout extensions, regrading, and window well drainage is straightforward DIY work that costs $50 to $500 and eliminates the majority of basement water problems. Sealing hairline cracks with hydraulic cement or polyurethane caulk is also a DIY repair. Through-wall crack injection, interior drainage systems, and exterior waterproofing require professional equipment and experience and should not be attempted as DIY projects.
What is hydrostatic pressure and why does it matter?
Hydrostatic pressure is the force exerted by water-saturated soil against the foundation walls and floor. When soil around the foundation becomes saturated after rain, it becomes heavy and presses against the wall from the outside. Water follows the path of least resistance, including through cracks, the cove joint, pipe penetrations, or directly through the wall pores if pressure is high enough. Hydrostatic pressure is why some basements leak even when there is no obvious crack or gap. It is also why waterproof paint fails when applied over an active leak. The pressure behind the coating eventually overcomes the paint bond.
How long does a basement water repair last?
Surface drainage improvements last indefinitely with annual maintenance. Crack injection repairs last 10 to 20 years if the crack is stable and not subject to ongoing movement. Interior drainage systems last 20 to 30 years with sump pump maintenance and occasional drain flushing. Exterior waterproofing membranes last 20 to 30 years. No basement waterproofing solution lasts forever because the conditions that cause water intrusion, including soil pressure, settlement, and freeze-thaw cycles, continue to act on the foundation over time.
Should I get multiple quotes for basement waterproofing?
Always get at least three quotes, and be cautious of any contractor who diagnoses your problem without inspecting during or after a rain event. The most common basement waterproofing scam is diagnosing a $10,000 interior drainage system for a problem that requires a $200 downspout extension. A legitimate waterproofing contractor will ask where the water appears, how long after rain it appears, and whether the problem is getting worse. They will inspect the exterior drainage conditions as well as the interior. Get quotes in writing with specific scope of work before agreeing to anything.
What is efflorescence and does it mean I have a water problem?
Efflorescence is the white chalky mineral deposit that forms on concrete or masonry walls when water moves through the wall and evaporates on the surface, leaving dissolved minerals behind. It is a sign that water has moved through the wall in the past, but does not necessarily mean active liquid water intrusion is occurring now. Light efflorescence on an otherwise dry wall indicates past moisture migration that may have already been addressed. Heavy efflorescence, or efflorescence that reappears after cleaning, indicates ongoing water movement through the wall that should be investigated.
External Resource
The EPA's guide to preventing and addressing mold growth caused by moisture problems in residential buildings, including basements.
Related Guides
On thebasement.guide
Every waterproofing method explained with costs and when each is appropriate.
How perimeter drainage and sump systems work and what they cost.
Cost breakdown by crack type and repair method.
Pump selection, sizing, and installation for homes with drainage systems.
Full cost breakdown for every waterproofing approach.
Glossary
Hydrostatic pressure
The force exerted by water-saturated soil against the foundation walls and floor slab. Hydrostatic pressure increases with soil saturation, depth of the foundation, and soil type. Clay soils retain water longer than sandy soils and generate sustained hydrostatic pressure for days after a rain event. It is the primary driver of cove joint seepage and wall seepage in the absence of visible cracks.
Cove joint
The joint between the foundation wall and the floor slab in a poured concrete basement. The wall and floor are poured separately in most residential construction, leaving a natural gap between them. This gap is a primary entry point for water under hydrostatic pressure. Water appearing as a wet line along the base of one or more walls is almost always entering through the cove joint.
Crack injection
A professional repair method for through-wall foundation cracks that involves drilling ports along the crack, injecting polyurethane foam or epoxy resin under pressure, and sealing the ports. Polyurethane injection is flexible and appropriate for cracks subject to minor movement. Epoxy injection is rigid and appropriate for structural cracks requiring bonding strength. Neither method should be applied to actively leaking cracks without first stopping the active flow with hydraulic cement.
Efflorescence
The white chalky mineral deposit that forms on concrete or masonry surfaces when water carries dissolved salts through the material and evaporates on the surface. A sign that water has moved through the wall in the past. Heavy or recurring efflorescence indicates ongoing water migration.
Interior drainage system
A water management system installed at the base of the interior foundation wall that intercepts water entering through the cove joint or wall and directs it to a sump pit for removal. The system does not prevent water from entering the foundation but controls it after entry. Also called a French drain, perimeter drain, or channel drain system depending on the manufacturer.
Exterior waterproofing
A waterproofing approach that involves excavating soil from around the foundation exterior, applying a waterproof membrane to the outside of the foundation wall, installing drainage board and aggregate backfill, and in some cases adding an exterior drain tile at the footing. Addresses the source of water pressure rather than managing water after it enters. The most permanent waterproofing solution and the most expensive.
Window well
The semicircular or rectangular metal or plastic enclosure installed around below-grade basement windows to hold back soil and allow natural light into the basement. A window well without proper drainage fills with water during rain events and creates direct pressure against the window frame. Proper window wells have a gravel base for passive drainage and may include a drain pipe connected to the foundation drainage system.
Negative grade
A ground slope condition where soil, hardscape, or landscaping around the foundation directs water toward the house rather than away from it. Negative grade is one of the most common and most correctable causes of basement water intrusion. The correct grade slopes away from the foundation at a minimum of 6 inches of drop over the first 10 feet. Correcting negative grade with topsoil is typically a DIY repair costing $200 to $500 in materials.
Hydraulic cement
A fast-setting cement product that expands slightly as it cures, forming a watertight plug in cracks, holes, and pipe penetrations. Used to stop active water flow through foundation cracks and around pipe penetrations. Sets in 3 to 5 minutes and tolerates direct water contact during curing. A first-step repair that stops active flow before crack injection or other permanent repairs.