How to Dry Out
a Flooded Basement
What you do in the next 24 to 72 hours determines whether you’re dealing with a minor cleanup or a $10,000 mold remediation project.
The Basement Guide Staff
Updated March 2026 · 25 min read
Basement flood recovery is the process of safely removing standing water, extracting moisture from building materials, and restoring a flooded basement to dry, habitable condition before mold colonization begins. The window for preventing mold is narrow — the EPA notes that mold can begin growing on wet surfaces within 24 to 48 hours, which means the speed and thoroughness of the drying response directly determines whether you are dealing with a cleanup or a remediation project. Recovery involves water extraction, mechanical drying with dehumidifiers and air movers, selective demolition of porous materials that cannot be adequately dried, disinfection of exposed surfaces, and moisture verification with a meter before any finishes are replaced. The source of the flooding — whether a failed sump pump, foundation crack, surface drainage, or sewer backup — must be identified and corrected before reconstruction begins to prevent a repeat event.
Your basement just flooded. The water’s out—or mostly out—and now you’re staring at a soggy mess, wondering what comes next. This is the part most guides skip. They tell you to call a professional and move on. But what you do in the next 24 to 72 hours determines whether you’re dealing with a minor cleanup or a $10,000 mold remediation project.
This guide picks up where our emergency water plan leaves off. The immediate crisis is handled. Now it’s time to dry everything out, figure out what stays and what goes, and make sure mold doesn’t get a foothold.
The clock starts the moment floodwater enters your basement. According to the EPA, mold can begin colonizing wet surfaces within 24 to 48 hours. Every hour you shave off the drying timeline reduces your risk—and your repair bill.
How Long Does It Take to Dry Out a Basement After Flooding?
There’s no single answer, but here’s a realistic framework most guides won’t give you.
Minor Flood
An inch or two of clean water on bare concrete. 2–4 days with proper equipment.
Moderate Flood
Soaked into drywall, carpet, and stored belongings. 5–10 days with aggressive drying.
Severe Flood
Several feet of water, finished walls, contaminated water. 2–4 weeks with professional equipment.
What affects your drying timeline
- • The volume of water and how long it sat before removal
- • What materials got wet—bare concrete dries much faster than finished walls with insulation
- • Ambient temperature and humidity outside
- • What drying equipment you’re running
- • Whether the original water source has been fully stopped
Important: Even after your basement looks dry, the concrete slab and walls are still releasing moisture. Concrete can hold water for weeks after a flood event. You cannot judge dryness by how the surface looks or feels—you need a moisture meter.
The Drying Process: Step by Step
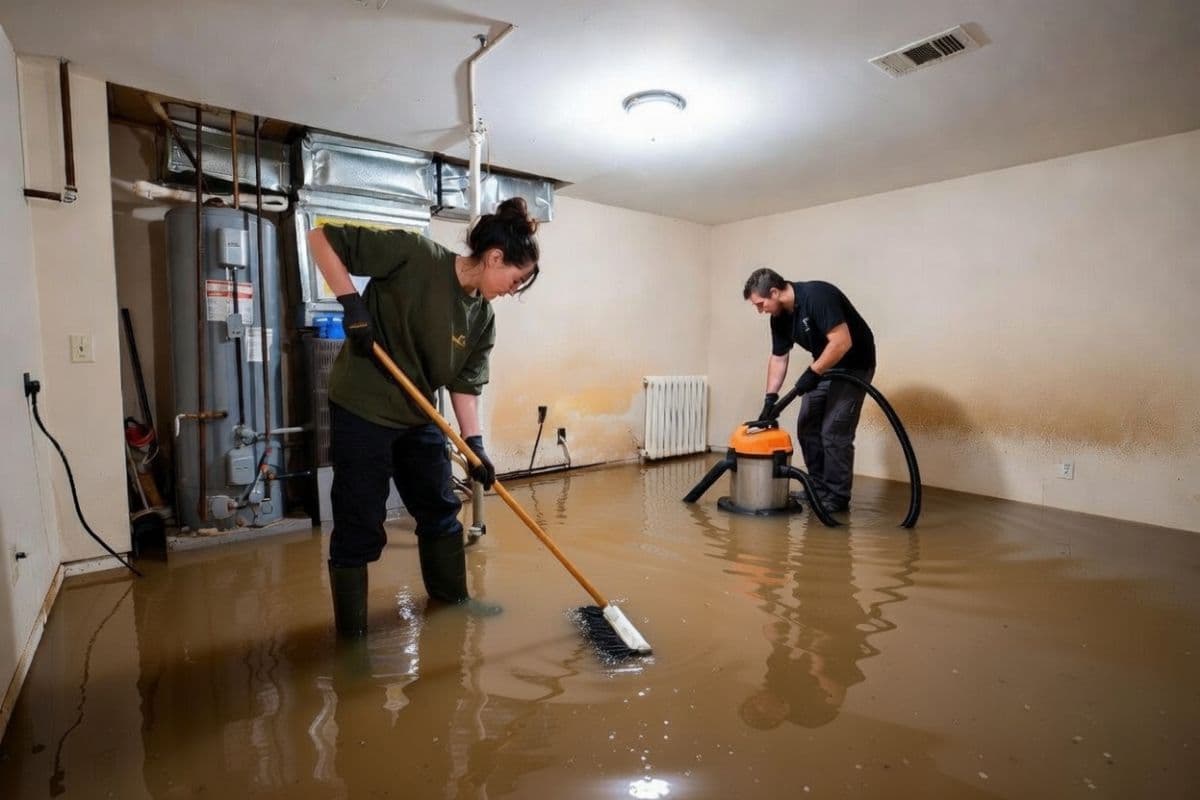
Get the Last of the Standing Water Out
If you haven’t already removed all standing water, that’s the first priority. A wet/dry shop vac handles puddles and shallow water. For anything deeper, a submersible utility pump moves water fast—available for rental at most home improvement stores.
Critical safety warning: If floodwater is still high outside your foundation, pump slowly. Remove roughly one-third of the water per day. Pumping too fast when the ground outside is still saturated creates a pressure imbalance that can cause basement walls to bow inward and floor slabs to heave.
Once the standing water is gone, use a floor squeegee to push remaining water toward your floor drain or sump pit. Mop up what’s left. The goal is to eliminate every visible puddle before you start the active drying phase.
Set Up Your Drying Equipment
Effective basement drying requires two things working together: dehumidification and air movement. One without the other is dramatically less effective.
Dehumidifiers
For post-flood drying, you need serious capacity. A standard 50-pint residential dehumidifier can work for a minor flood. For anything significant, you want a commercial unit pulling 100+ pints per day.
Place the dehumidifier centrally, not against a wall. Set it to the lowest humidity setting. If you own a high-capacity basement dehumidifier, get it running immediately. The Frigidaire Gallery 50 Pint is a solid residential option.
Air Movers & Fans
High-velocity fans create airflow across wet surfaces. Position fans to blow across the floor and along the base of walls—not straight at the wall from six feet away. You want air scrubbing across wet surfaces.
For a typical 1,000 sq ft basement, the professional standard is 3–4 air movers plus one commercial dehumidifier. If you’re using household box fans, double the count.
Should you open windows? If the outside air is drier than the basement air (common in cooler weather), opening windows helps. If it’s hot and humid outside, keep windows closed and let the dehumidifier do the work. Don’t run the heating system to “bake out” moisture—warm humid air is exactly what mold needs. Air conditioning is a better choice.
Remove What Can’t Be Saved
Porous materials that absorbed floodwater are ticking mold bombs. The sooner you get them out, the faster everything else dries.
Carpet & Carpet Padding
The padding must go—it’s a dense sponge that will never fully dry in place. The carpet itself might be salvageable if the flood was clean water and you can dry it within 48 hours. Pull it up, drape it over sawhorses, and run fans on it. Realistically, most flood-soaked carpet ends up in the dumpster. New flooring is cheaper than mold remediation.
Drywall
If floodwater reached less than 2.5 feet up the wall, cut the drywall out to a height of 4 feet (standard sheet height for easier replacement). If water was higher than 2.5 feet, remove all the way to the ceiling.
Why cut higher than the waterline? Drywall wicks moisture upward. The water may have reached 2 feet, but the drywall absorbed moisture a foot or more above that. Cut at least one foot above the visible waterline.
Behind the Drywall
After cutting out drywall, inspect the wall cavity. Wet fiberglass batt insulation must come out—it traps moisture against wall studs, creating the perfect environment for invisible mold growth. Pull it all out, bag it, and dispose of it.
Baseboards, Furniture & Stored Items
Remove baseboards—they trap moisture between themselves and the wall. MDF and composite baseboards that got soaked need replacing. Solid wood furniture can often be saved if dried quickly. Upholstered furniture and particleboard/MDF furniture that absorbed floodwater are rarely worth saving.
Clean and Disinfect Before Drying
Floodwater carries bacteria, soil contaminants, and organic material that feed mold growth. For concrete floors and masonry walls, scrub with detergent and warm water first, then disinfect with a diluted bleach solution—roughly 3/4 cup of household bleach per gallon of water. Apply, let sit for five minutes, then rinse.
For wood framing exposed after removing drywall, a commercial antimicrobial spray is more effective than bleach because it penetrates into the wood rather than just treating the surface.
Sewage warning: If the flood involved sewage or black water, the disinfection requirements are significantly more aggressive. Sewage-contaminated flooding is a professional job—the health risks from attempting to DIY sewage cleanup are serious.
How Do You Know When Your Basement Is Actually Dry?
You need a pin-type moisture meter ($25–$50)—one of the most valuable tools you can own as a homeowner.
| Material | Target | Caution Zone | Danger Zone |
|---|---|---|---|
| Wood framing | Below 15% | 15–19% | Above 20% |
| Concrete | Tape plastic sheeting to surface, check after 24 hrs—no condensation = dry | ||
Do not skip this step. The #1 cause of mold problems after basement flooding isn’t the initial flood—it’s closing up walls and reinstalling finishes before materials are fully dry. Once you put drywall over damp studs or lay flooring over a concrete slab that’s still off-gassing moisture, you’ve created a sealed, dark, damp environment where mold flourishes unseen.
What About Mold? When Should You Worry?
Worry now, act now. Don’t wait to see visible mold before taking action—by the time you can see it, you have a much bigger problem hiding behind it.
If you’ve followed the steps above—removed standing water within hours, stripped out wet porous materials, set up aggressive drying equipment, and cleaned exposed surfaces—you’ve done the most important things to prevent mold.
Call a professional mold remediation company if:
- • You see visible mold growth on any surface
- • The total affected area exceeds roughly 10 square feet
- • The flood involved sewage or contaminated water
- • Finished spaces were flooded and you couldn’t access wall cavities within 48 hours
- • Anyone in the household has respiratory issues or immune system concerns
For more on what remediation involves and costs, see our mold remediation cost guide.
For small areas (under 10 sq ft) on exposed concrete or wood framing, scrub with detergent and water, let dry, then apply antimicrobial treatment. Wear an N95 respirator mask, gloves, and eye protection.
Should You Hire a Professional or DIY?
DIY Is Reasonable When:
- • The flood was clean water (groundwater, rain, burst supply pipe)
- • Water level was under a foot
- • You have access to drying equipment
- • The basement is unfinished or you’re willing to strip materials yourself
- • You can get drying started within 24 hours
Call a Professional When:
- • Water level exceeded a few feet
- • The flood involved sewage or contaminated water
- • Your basement was finished and needs walls opened up
- • You can’t get adequate drying equipment
- • You plan to file an insurance claim (professional documentation strengthens claims)
Professional water damage restoration typically runs $1,500–$5,000 for a standard basement. Severe floods with contaminated water and mold remediation can run $5,000–$15,000+.
How to Document Everything for Your Insurance Claim
Start documenting before you start cleaning. This is the step people most regret skipping.
Photograph & Video
- • Water level at its highest point
- • All damaged materials—walls, floors, belongings
- • The source of the water if identifiable
- • Serial/model numbers of damaged appliances
- • Overall scope from multiple angles
Write Down
- • Date and time you discovered the flood
- • What you think caused it
- • Detailed inventory of damaged items with estimated values
- • Every action you took and when
- • Every conversation with your insurer (dates, names, what was said)
Don’t throw anything away until your insurance adjuster has seen it or you’ve been told in writing you can dispose of damaged items. See our basement flooding insurance guide for full coverage details.
Can You Prevent This from Happening Again?
A flood is a painful teacher, but an effective one. Here’s what actually works:
Fix whatever caused this flood first
If your sump pump failed, replace it and add a battery backup system. If water came through foundation cracks, get them repaired. If surface drainage sent water toward your foundation, regrade and extend your downspouts.
Install a water alarm or smart leak detection system
Water leak detectors cost as little as $20 and alert you the moment water appears on the floor—buying you hours of response time.
Rebuild with flood-resistant materials
Use closed-cell rigid foam insulation instead of fiberglass batts. Choose waterproof LVP flooring instead of carpet. Use paperless drywall for lower wall portions. Install PVC or composite baseboards instead of MDF. These choices cost slightly more upfront but mean the next water event is a cleanup instead of a demolition.
Consider a full waterproofing system
An interior drain tile system with a sump pump costs a fraction of what repeated flooding damage costs over time. See our waterproofing cost guide for what to expect.
Basement Flood Drying Checklist
First 24 Hours
- ☐ Remove all standing water
- ☐ Set up dehumidifiers and air movers
- ☐ Strip out carpet padding, heavily soaked carpet, and visibly ruined items
- ☐ Cut out wet drywall to appropriate height
- ☐ Remove wet fiberglass insulation from wall cavities
- ☐ Take photos and video of all damage for insurance
24 to 72 Hours
- ☐ Clean and disinfect all hard surfaces
- ☐ Continue running drying equipment around the clock
- ☐ Sort salvageable vs unsalvageable items
- ☐ File your insurance claim
- ☐ Begin checking moisture levels with a meter
3 to 14 Days
- ☐ Monitor moisture meter readings daily
- ☐ Keep equipment running until target levels reached (below 15% for wood)
- ☐ Watch for signs of mold on any surface
- ☐ Do not reinstall any finishes until readings confirm full drying
Equipment You’ll Need for Basement Flood Recovery
Water Removal
- • Wet/dry shop vac for puddles and shallow water
- • Submersible utility pump for deeper flooding (rental available)
- • Floor squeegee and mop for final cleanup
Drying
- • High-capacity dehumidifier (50+ pints/day minimum)
- • High-velocity air movers (3–4 for typical basement)
- • Box fans as backup (double the count vs air movers)
Measuring
- • Pin-type moisture meter ($25–$50)
- • Basic hygrometer (under $20) for room humidity levels
Safety & Cleanup
- • N95 respirator masks
- • Rubber boots and rubber gloves
- • Eye protection
- • Pump sprayer for antimicrobial treatment
- • Contractor trash bags
Frequently Asked Questions
Will a flooded basement dry on its own?
Not fast enough to prevent mold. An unassisted basement can take weeks or months to fully dry depending on the volume of water, ambient humidity, and what materials got wet. The EPA notes mold begins colonizing wet surfaces within 24 to 48 hours, meaning passive drying without equipment almost guarantees a mold problem. Active drying with high-capacity dehumidifiers, air movers, and removal of saturated porous materials can compress the drying timeline from weeks to days. Every hour between water entry and active drying response increases both mold risk and total repair cost.
Does bleach kill mold after a flood?
Bleach kills mold on hard, non-porous surfaces like concrete and tile where it makes full contact. It does not penetrate porous materials like wood framing or drywall — it bleaches the surface so mold appears gone, but the root structure (hyphae) remains alive inside the material. For exposed wood studs and framing, physical scrubbing with detergent followed by a commercial antimicrobial spray that penetrates wood fiber is more effective than bleach alone. For any mold growth exceeding 10 square feet, or for any contaminated water situation, professional remediation is the appropriate response regardless of cleaning method.
Should I run my furnace to dry out the basement?
No. Raising the temperature with the furnace increases the air’s capacity to hold moisture, which worsens effective humidity without removing water from the space. Air conditioning is a better choice because it cools air and removes moisture as a byproduct of the cooling process. A dedicated dehumidifier is the most effective tool because it is specifically designed to extract moisture from the air at high volume. Run the dehumidifier continuously on its lowest humidity setting, and pair it with air movers to keep air circulating across wet surfaces for maximum drying speed.
How do I dry out finished basement walls without removing drywall?
In most cases you cannot dry finished walls adequately without opening them up. Drywall and fiberglass batt insulation are highly absorptive and trap moisture against wood studs, creating invisible mold conditions within days. The minimum intervention is removing baseboards and cutting a 6-inch strip of drywall along the floor to allow airflow into the wall cavity, then directing air movers at the opening. Use a moisture meter to probe the studs through the opening — if readings stay above 15 percent after several days of aggressive drying, the drywall must come out. Cutting to 4 feet and replacing is significantly cheaper than mold remediation behind intact walls discovered months later.
How do you know when your basement is actually dry?
Visual inspection is not reliable — concrete and wood can appear dry on the surface while still holding significant moisture. A pin-type moisture meter ($25 to $50) is the only way to confirm actual dryness. Wood framing should read below 15 percent before any insulation or drywall is reinstalled. For concrete slabs, tape a 12-by-12-inch sheet of plastic sheeting to the floor with all edges sealed, leave it for 24 hours, and check for condensation on the underside — condensation means the slab is still off-gassing moisture. Do not reinstall any finishes until both wood and concrete readings confirm full drying. This is the step most homeowners skip and later regret.
Should I hire a professional or handle basement flood recovery myself?
DIY is reasonable when the flood involved clean water (groundwater, rain, burst supply line), water depth was under a foot, you can start drying within 24 hours, and the basement is unfinished or you are willing to strip materials yourself. Call a professional when water exceeded a few feet, the source was sewage or contaminated water, the basement was fully finished and walls cannot be opened quickly, you cannot source adequate drying equipment, or you plan to file an insurance claim (professional documentation and scope reports significantly strengthen claims). Professional water damage restoration runs $1,500 to $5,000 for a standard basement. Sewage contamination with mold remediation can reach $5,000 to $15,000 or more.
Is it safe to turn the electricity back on after a basement flood?
Not until a licensed electrician has inspected the basement. Any outlet, switch, junction box, or panel component that was submerged must be checked and potentially replaced before power is restored. Floodwater deposits corrosive mineral sediment inside electrical components that creates shock and fire hazards even after the component has fully dried and appears undamaged. Do not restore power yourself based on how things look — the failure mode for flood-damaged electrical components is often delayed, appearing weeks after the flood when the residue begins conducting. A licensed electrician inspection is the only safe path to restoring basement power after any significant flooding event.
Does homeowners insurance cover basement flooding?
Standard homeowners insurance covers sudden, accidental water damage from burst pipes, appliance failures, and similar internal events. It typically does not cover groundwater seepage, natural flooding from external water sources, sewer backup, or sump pump failure unless you have added specific endorsements. A water backup and sump pump overflow rider costs $40 to $100 per year and covers the most common basement flooding scenarios. Flood insurance through the NFIP covers natural flood events but has a 30-day waiting period before coverage takes effect — it cannot be purchased reactively. See our basement flooding insurance guide for full coverage details.
Glossary of Basement Flood Recovery Terms
Category 1 Water (Clean Water)
Floodwater from a sanitary source such as a burst supply pipe, rain intrusion, or groundwater seepage. Poses no immediate health risk from the water itself, though it can become Category 2 within 24 to 48 hours as it contacts building materials and organic matter. DIY recovery is generally appropriate for Category 1 events.
Category 2 Water (Gray Water)
Floodwater containing significant contamination from sources such as washing machine overflow, dishwasher backup, or aquarium water. Contains microorganisms and nutrients that accelerate mold growth and pose health risks if ingested or contacted. Requires more aggressive disinfection than Category 1 and protective equipment during cleanup.
Category 3 Water (Black Water)
Grossly contaminated floodwater from sewage backup, toilet overflow, or rising floodwater from rivers and storm drains that has contacted sewage systems. Contains pathogens, bacteria, and toxins that pose serious health risks. Category 3 cleanup requires professional remediation with full protective equipment — DIY is not appropriate.
Air Mover
A high-velocity fan designed to create turbulent airflow across wet surfaces to accelerate evaporation. More effective than standard box fans because they move more air at lower heights and direct it across surfaces rather than through the room. Professional standard is 3 to 4 air movers per 1,000 square feet in combination with a commercial dehumidifier.
Moisture Meter
A handheld device that measures the moisture content of building materials. Pin-type meters insert small probes into wood framing to give a percentage reading. The target for wood framing before reinstalling finishes is below 15 percent. An essential tool for confirming actual dryness rather than relying on visual inspection.
Antimicrobial Treatment
A chemical solution applied to exposed building materials after cleaning to kill remaining mold spores and inhibit future growth. More effective than bleach on porous materials like wood framing because it penetrates the surface rather than treating only the top layer. Applied after physical scrubbing and cleaning, not as a substitute for it.
Dehumidifier (Refrigerant vs Desiccant)
Two main dehumidifier types used in flood recovery. Refrigerant dehumidifiers work by cooling air below its dew point to condense moisture and are most effective above 65 degrees Fahrenheit — the standard choice for most basement drying situations. Desiccant dehumidifiers use a moisture-absorbing material and work effectively at lower temperatures, making them the professional choice for cold-weather flood events or when basement temperatures are below 60 degrees.
Moisture Wicking
The upward movement of water through porous materials by capillary action. Drywall, wood framing, and concrete all wick moisture above the visible waterline — which is why drywall should always be cut at least 12 inches above the actual waterline, not at it. Moisture wicking is the primary reason visible water level does not accurately indicate the extent of wet materials.
Sewage Ejector Pit
A sealed underground pit in a basement that collects waste from below-grade plumbing before an ejector pump sends it to the main drain line. During sewer backup events, the ejector pit is often the first place sewage enters the basement. A flooded ejector pit indicates Category 3 contamination requiring professional cleanup.
Psychrometric Drying
The professional science of calculating and optimizing drying conditions by managing the relationship between temperature, humidity, and airflow. Restoration contractors use psychrometric calculations to determine the precise number and placement of dehumidifiers and air movers needed for a given space, material type, and target drying timeline. Referenced in IICRC S500 — the standard for professional water damage restoration.
Related Guides
Emergency Water Plan
If water is flooding your basement right now, start here.
Mold Prevention Guide
The 5 pillars of permanent basement mold prevention.
Mold Remediation Cost
What professional mold removal costs in 2026.
Basement Flooding Insurance
What’s actually covered and what isn’t.
Best Basement Dehumidifiers
Top-rated dehumidifiers for moisture control.
Complete Waterproofing Guide
The full playbook for keeping your basement dry.
Get a Free Waterproofing Assessment
Dealing with recurring basement flooding? Connect with a vetted local waterproofing expert for a free diagnosis and quote.