An interior basement drainage system is the most common professional solution for a wet basement. It is a subsurface or surface-mounted channel installed along the interior perimeter of the basement floor that intercepts groundwater entering through the foundation walls, cove joint, and floor slab, then routes it to a sump pump for ejection outside the home. Interior drainage does not prevent water from entering the foundation; it manages water after entry, keeping the basement floor dry by giving groundwater a controlled path to the sump pit before it can spread across the floor. The system category includes traditional sub-floor French drains, engineered channel products like WaterGuard, above-floor baseboard systems like DryTrak, and thin-floor variants, each designed for a specific foundation type and water intrusion pattern. Choosing the wrong system type for your foundation is the most common source of interior drainage failures, which is why understanding the difference between a monolithic foundation and a standard separate-footing foundation matters before you accept any contractor's proposal.
Unlike exterior waterproofing, which prevents water from reaching your foundation, interior drainage manages water that has already entered, keeping your basement dry from the inside.
If you have gotten quotes from basement waterproofing contractors, you have probably heard brand names like WaterGuard, DryTrak, or terms like drain tile and perimeter drain. These all refer to variations of interior drainage systems, but they work differently, cost differently, and suit different foundation types.
This guide explains every type, compares costs per linear foot, and helps you understand what contractors are actually proposing so you can make an informed decision. For cost-specific information, see our French drain cost guide and basement waterproofing cost guide. For sump pump selection, see our sump pump buying guide.
How Interior Basement Drainage Systems Work
All interior basement drainage systems follow the same basic principle. Water enters the basement through foundation walls, the floor slab, or the joint where the wall meets the floor (called the cove joint). The drainage system intercepts this water before it reaches the livable area of your basement and channels it through a sloped pipe or channel to a sump pump pit. The sump pump then ejects the water outside and away from the house.
The key difference between system types is where and how they are installed relative to your basement floor, your foundation footing, and your walls.
What Is the Cove Joint and Why Does It Matter?
The cove joint is the seam where your basement floor meets your foundation wall. In most homes, the floor and the wall are two separate concrete pours, and there is a natural gap between them. This gap is the single most common entry point for water in basements because hydrostatic pressure (water pressure from the surrounding soil) pushes groundwater upward through this joint.
Nearly every interior drainage system is designed to intercept water at or near the cove joint. Understanding this helps you evaluate contractor proposals because the system type they recommend should match where your water is coming from and what type of foundation you have.
Types of Interior Basement Drainage Systems
There are four main categories of interior basement drainage systems. Each one is designed for a specific foundation type and water intrusion pattern.
1. Sub-Floor Perimeter Drain (Standard Interior French Drain)
This is the most common interior basement drainage system. A trench is jackhammered along the interior perimeter of the basement floor, a perforated pipe is placed in a bed of gravel at the base of the footing, and the trench is backfilled with gravel and covered with fresh concrete.
How it is installed: The contractor jackhammers a strip of concrete typically 12 to 18 inches wide along the perimeter, digs a trench alongside or on top of the footing, lays perforated PVC or corrugated pipe in a bed of washed gravel, and then pours new concrete over the top. The entire system is hidden beneath the floor when complete.
Best for: Standard poured concrete and concrete block foundations with a separate footing and floor slab. This covers the majority of homes built after 1970.
Pros
- Highly effective at capturing wall seepage and sub-slab water
- Completely hidden when installed
- Long track record of performance
- Compatible with any sump pump system
Cons
- Requires jackhammering — significant dust and noise
- Installation takes 2 to 5 days
- Pipe sits in the “mud zone” — can clog with sediment over decades
Cost: $40 to $85 per linear foot installed, or $4,000 to $12,000 for a full perimeter.
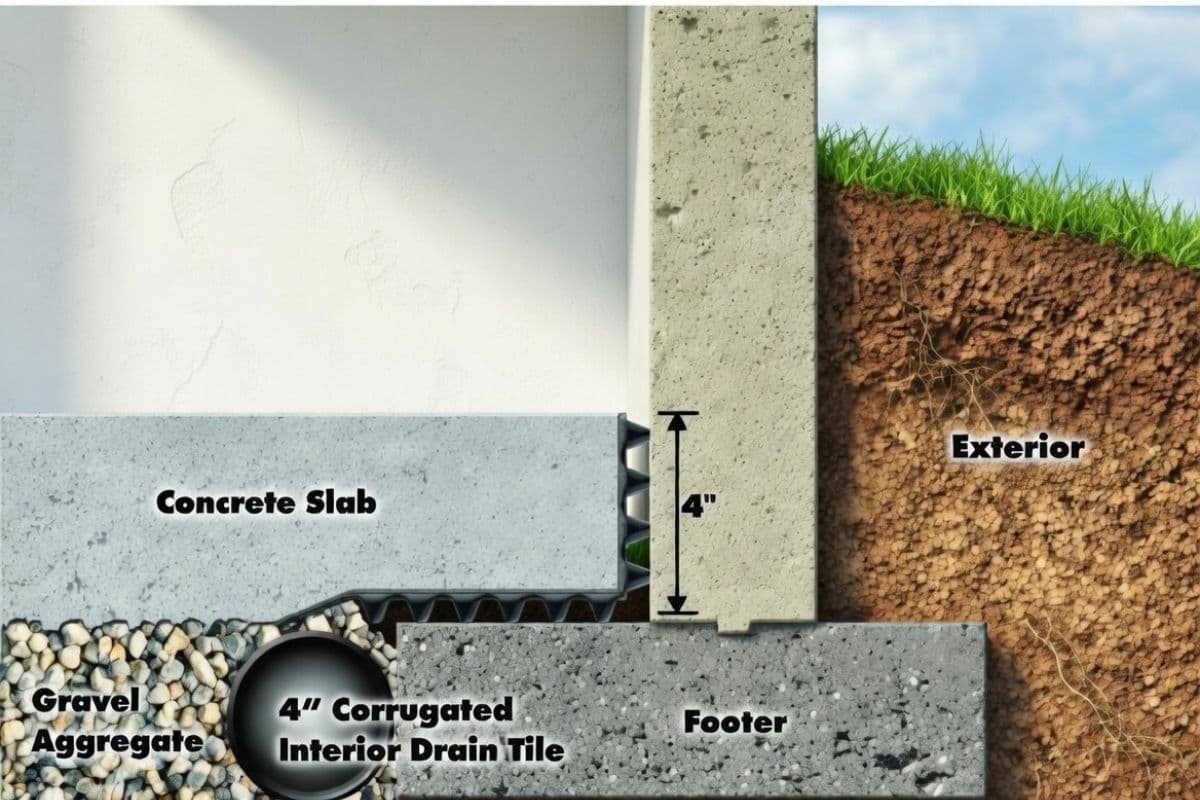
2. Engineered Channel Drain Systems (WaterGuard and Similar)
Engineered channel drains are the modern evolution of the traditional interior French drain. Instead of a round perforated pipe sitting in gravel at the footing level, these systems use a specially shaped plastic drainage channel that sits on top of the foundation footing, above the mud zone. This design resists clogging because the channel never contacts the soil directly.
The most widely installed product in this category is WaterGuard, manufactured by Basement Systems and installed through their dealer network of over 350 contractors across the US and Canada.
How it is installed: The contractor jackhammers a narrow strip of concrete along the perimeter, positions the channel on top of the footing in a bed of crushed stone, and pours new concrete. A wall flange extends slightly up the basement wall (about 3/8 inch) to capture water seeping down the wall face.
Best for: Most basement types with standard non-monolithic foundations. Particularly suited for concrete block wall foundations because the wall flange captures water draining through hollow block cores.
Pros
- Sits above the mud zone — highly clog-resistant
- Wall flange captures wall seepage traditional systems miss
- Narrower trench — less jackhammering, faster install
- Often includes lifetime transferable warranties
Cons
- Only available through authorized dealer networks
- Typically more expensive per linear foot than generic French drains
- Still requires jackhammering (just a narrower cut)
Cost: $50 to $100 per linear foot installed, or $5,000 to $15,000 for a full perimeter.
3. Baseboard or Surface-Mounted Drainage Systems (DryTrak and Similar)
Baseboard drainage systems are installed on top of the basement floor along the wall perimeter rather than beneath it. The system is a plastic channel permanently bonded (epoxied) to the floor surface with a slight opening at the top to collect water seeping through the cove joint.
The most widely known product is DryTrak, also manufactured by Basement Systems.
How it is installed: No jackhammering required. The contractor cleans the floor surface, applies construction adhesive or epoxy, and secures the channel directly to the floor. Pipe runs carry collected water to the sump pump pit.
Best for: Homes with monolithic foundations where the floor and footing were poured as a single piece of concrete (most common in homes built between approximately 1950 and 1970). Jackhammering through a monolithic floor would damage the footing itself.
Pros
- No jackhammering, no concrete dust, fastest installation (often 1 day)
- Does not disturb the foundation footing
- The only practical option for monolithic foundations
- Will not clog — channel sits above the floor
Cons
- Visible along the base of the wall
- Only captures cove joint and wall water, not sub-slab water
- Less effective for homes with high water tables
- Slightly raised profile may interfere with furniture placement
Cost: $30 to $60 per linear foot installed, or $3,000 to $8,000 for a full perimeter.
4. Thin-Floor or Low-Profile Sub-Floor Systems (FlowGuard and Similar)
Some basements have floor slabs that are unusually thin (2 inches or less instead of the standard 4 inches). In these homes, there is not enough concrete depth to install a traditional sub-floor drain on top of the footing. Thin-floor systems sit in front of the footing rather than on top of it, in a shallow bed of drainage stone.
How it is installed: The contractor removes a narrow strip of concrete along the perimeter, places the drainage channel in a shallow bed of crushed stone in front of (not on top of) the footing, and restores the concrete. A wall flange captures wall seepage.
Best for: Basements with thin concrete floor slabs where standard sub-floor systems will not fit above the footing.
Pros
- Solves the thin-floor problem without undermining the footing
- Similar clog resistance to other engineered channel systems
Cons
- Limited availability — specialty contractors only
- Slightly less water-handling capacity than full-size systems
Cost: $50 to $90 per linear foot installed, similar to standard engineered channel systems.
Interior Drainage System Comparison Table
| Feature | Traditional French Drain | Engineered Channel (WaterGuard) | Baseboard (DryTrak) | Thin-Floor (FlowGuard) |
|---|---|---|---|---|
| Installed location | Below floor, at footing level | Below floor, on top of footing | On top of floor surface | Below floor, in front of footing |
| Jackhammering required | Yes (wide trench) | Yes (narrow trench) | No | Yes (narrow trench) |
| Best foundation type | Standard separate floor & footing | Standard separate floor & footing | Monolithic (floor & footing are one piece) | Standard with thin floor slab |
| Clog resistance | Moderate (sits in soil contact zone) | High (above mud zone) | High (above floor, no soil contact) | High (similar to engineered channel) |
| Captures wall seepage | Yes, if properly installed | Yes, via wall flange | Yes, via top opening | Yes, via wall flange |
| Captures sub-slab water | Yes | Yes | No (surface mount only) | Yes |
| Installation time | 2 to 5 days | 2 to 3 days | 1 to 2 days | 2 to 3 days |
| Cost per linear foot | $40 to $85 | $50 to $100 | $30 to $60 | $50 to $90 |
| Full perimeter cost | $4,000 – $12,000 | $5,000 – $15,000 | $3,000 – $8,000 | $5,000 – $12,000 |
| Visibility after installation | Completely hidden | Completely hidden | Visible along wall base | Completely hidden |
| Warranty | Varies by contractor | Often lifetime transferable | Often lifetime transferable | Often lifetime transferable |
For a complete cost estimate that includes interior drainage system installation along with any associated waterproofing scope, try our basement waterproofing cost calculator.
What Contractors Are Actually Selling You
When a basement waterproofing contractor visits your home, they will typically propose a complete system, not just the drainage channel. Understanding the components helps you compare quotes accurately.
A typical interior drainage system quote includes:
- The drainage channel or pipe installed along some or all of your basement perimeter
- A sump pump pit and pump to eject the collected water
- A discharge line from the sump pump to an exterior exit point
- Concrete restoration to replace the jackhammered sections of floor
- Basic crack sealing at the cove joint or visible wall cracks
Common add-ons that increase the price:
- A backup sump pump (battery-powered or water-powered) for power outage protection
- A dehumidifier to control residual humidity
- Vapor barrier or wall panels (see our best vapor barriers guide)
- Weep holes drilled into concrete block walls to drain trapped water
- Discharge line accessories like freeze-resistant outlets or extended runs
How to compare quotes fairly:
- Make sure each quote specifies the same linear footage of drainage
- Ask whether the quote includes full perimeter or partial perimeter installation
- Confirm what sump pump model and capacity is included
- Ask whether concrete restoration, cleanup, and debris removal are included
- Compare warranty terms: length, what is covered, and whether it transfers to a new homeowner
Do You Need Full Perimeter or Partial Perimeter Drainage?
Not every basement needs drainage around all four walls. The answer depends on where the water is entering.
Full Perimeter (All 4 Walls)
Recommended when:
- Water enters from multiple walls
- Your home has a high water table pushing water up on all sides
- You are finishing the basement and want comprehensive protection
Partial Perimeter (1–3 Walls)
May be sufficient when:
- Water only enters from one or two walls (common with slope or poor grading)
- The problem is clearly localized to specific areas
- Your budget is limited and you want to address worst areas first
Most contractors will recommend full perimeter installation because it provides the most complete protection and is only marginally more expensive than a 3-wall system when you factor in fixed costs. However, partial installation is a legitimate option for localized water problems. A reputable contractor will explain the tradeoffs honestly.
Interior Drainage vs Exterior Waterproofing: Which Do You Need?
This is the most important decision in basement waterproofing. Here is an honest comparison.
| Factor | Interior Drainage | Exterior Waterproofing |
|---|---|---|
| What it does | Manages water that has already entered by collecting and removing it | Prevents water from reaching the foundation in the first place |
| Typical cost | $4,000 to $15,000 | $8,000 to $18,000 (requires excavation) |
| Installation disruption | Indoor noise and dust for 2–5 days. Yard untouched. | Major exterior excavation. Landscaping may be destroyed. |
| Effectiveness | Highly effective at keeping floor dry. Does not stop wall penetration. | Stops water before it reaches walls. Protects foundation structure. |
| Best for | Most homes with wall seepage or sub-slab water. The standard for existing homes. | Homes with severe exterior pressure, failing walls, or new construction. |
| Longevity | 15 to 25 years | 20 to 30 years |
For a deeper comparison, see our interior vs exterior waterproofing guide.
The practical reality: Most existing homes get interior drainage systems because exterior waterproofing requires digging up the entire perimeter of the house, which is expensive, destructive to landscaping, and sometimes physically impossible. Interior drainage is less invasive, less expensive, and solves the immediate problem of water on your basement floor.
Installation Process: What to Expect
Here is what a typical interior drainage system installation looks like from start to finish.
Before Installation
Clear items away from the walls where the system will be installed. If you have a finished basement, the contractor will need to remove the bottom section of drywall or paneling along affected walls. Ask whether this is included in the quote.
Day 1 (and sometimes Day 2): Trenching and Channel Placement
The crew jackhammers a strip of concrete along the perimeter. This is the loudest and dustiest part. A good contractor will hang plastic sheeting to contain dust and seal HVAC vents. The trench is dug, the drainage channel is laid in crushed stone, and pipe runs are connected to the sump pump pit.
Sump Pump Installation
A pit is excavated at the lowest point of the basement, a sump basin is set in place, and the pump is installed. The discharge line is routed to the exterior of the home.
Concrete Restoration
Fresh concrete is poured over the drainage channel to restore the floor. The concrete needs 24 to 48 hours to cure before heavy foot traffic.
Cleanup and Testing
The crew cleans up debris, removes dust containment, and tests the sump pump. A good contractor will walk you through how the system works and explain the warranty.
Total timeline: 1 to 5 days depending on the system type and the length of the perimeter being treated. Baseboard (DryTrak-style) systems are the fastest at 1 to 2 days. Full perimeter sub-floor systems take 3 to 5 days.
Maintenance and Lifespan
Interior basement drainage systems are designed for long-term performance with minimal maintenance, but they are not completely maintenance-free.
Sump pump checks
Test your sump pump every 3 to 4 months by pouring a bucket of water into the pit. Replace the pump every 7 to 10 years preventively. See our sump pump buying guide and best sump pumps 2026.
Backup power
If your home loses power during a storm, the sump pump stops. A battery backup or whole-house generator protects against this. See our backup power for sump pumps guide.
Annual inspection
Check any visible service ports or cleanout access points for standing water or debris. Listen for unusual sump pump cycling.
Professional drain cleaning
Every 5 to 10 years, consider having a contractor flush the system with water to clear accumulated sediment. This is more important for traditional French drain systems than for engineered channel systems.
Expected Lifespan
- Traditional French drains: 15 to 25 years before potential clogging
- Engineered channel systems (WaterGuard type): 25+ years due to clog-resistant design
- Baseboard systems (DryTrak type): Indefinite lifespan for the channel itself
- Most brand-name systems include a lifetime or 25-year transferable warranty
Frequently Asked Questions
How much does an interior basement drainage system cost?
Interior basement drainage systems cost $40 to $100 per linear foot installed depending on the system type. A full perimeter installation for a typical 1,000 square foot basement runs $4,000 to $15,000 total. Baseboard-style systems are the least expensive at $30 to $60 per linear foot since no jackhammering is required. Engineered channel systems like WaterGuard cost $50 to $100 per linear foot including the wall flange and narrower concrete cut. Traditional sub-floor French drains run $40 to $85 per linear foot. All costs typically include the drainage channel, sump pump and pit, discharge line, and concrete restoration. For detailed pricing by method and basement size see our French drain cost guide and basement waterproofing cost guide.
What is the best interior drainage system for a basement?
The best system depends entirely on your foundation type, not on brand reputation. For standard foundations with a separate floor slab and footing — most homes built after 1970 — an engineered channel system like WaterGuard or a traditional interior French drain is the most effective option. For monolithic foundations where the floor and footing were poured as a single piece of concrete — common in homes built between 1950 and 1970 — a baseboard system like DryTrak is the only safe choice because jackhammering through a monolithic floor would damage the footing itself. For basements with unusually thin floor slabs under 2 inches, a thin-floor system like FlowGuard is required. A contractor who recommends a sub-floor system without first confirming your foundation type is not assessing your specific situation.
Is WaterGuard better than a French drain?
WaterGuard and similar engineered channel systems offer meaningful advantages over traditional French drains: they sit above the mud zone at the base of the footing, making them significantly more clog-resistant over time; they include a wall flange that captures water seeping down the wall face that traditional pipe systems can miss; and they require a narrower concrete cut, reducing jackhammering time. However, they are only available through authorized dealer networks and cost more per linear foot than generic French drains. A properly installed traditional French drain with clean washed gravel, quality perforated pipe, and a filter sock will also perform well for 15 to 25 years. The difference matters most in high-sediment soils and high-water-table situations where clogging risk over time is elevated.
Do interior drainage systems stop water from coming through basement walls?
No, and this is the most important limitation to understand before installation. Interior drainage systems intercept and manage water after it has entered the foundation — they do not create a barrier that prevents water from reaching or penetrating the wall. The floor stays dry because water is captured at the cove joint and sub-slab and routed to the sump before it spreads across the floor, but the wall itself may continue to show signs of moisture, efflorescence, or minor seepage. If stopping visible wall moisture is a priority — particularly before finishing — a vapor barrier or wall panel system installed over the drainage channel addresses this. Exterior waterproofing is the only method that actually prevents water from contacting the foundation wall.
Can I install an interior drainage system myself?
It is technically possible but not recommended for most homeowners. The job requires jackhammering concrete at a precise width and depth, proper grading of the drainage channel to slope toward the sump pit, correct sump pump sizing for your water volume, and concrete restoration to produce a stable, finished floor. Improper grading is the most common DIY failure — a channel that does not slope consistently will hold water rather than move it. Professional installation comes with a warranty, proper engineering for your specific foundation type, and accountability if the system underperforms. Baseboard-style systems are the most DIY-accessible since they require no concrete work, but even these require accurate layout and proper sump pump integration.
How long does interior drainage system installation take?
Total installation time runs 1 to 5 days depending on the system type and perimeter length. Baseboard systems that require no jackhammering are the fastest at 1 to 2 days. Full perimeter sub-floor systems with concrete restoration take 3 to 5 days. The jackhammering phase — typically Day 1 — is the loudest and dustiest portion. A reputable contractor will hang plastic sheeting to contain dust and seal HVAC vents during this phase. You can typically remain in your home during installation, though the noise and dust make it uncomfortable on jackhammering days. New concrete needs 24 to 48 hours to cure before heavy foot traffic.
Will an interior drainage system increase my home value?
A professionally installed interior drainage system with a documented warranty increases home marketability meaningfully. Buyers and their inspectors view a waterproofed basement with a working sump pump and transferable warranty favorably — it removes a common inspection objection and gives buyers confidence the issue was properly addressed rather than hidden. The system may not add dollar-for-dollar value in a formal appraisal, but it prevents the price reductions a wet or flood-prone basement would cause during negotiations and removes the condition from the inspection report. A transferable lifetime warranty from the installing contractor is particularly valuable because it gives the buyer direct coverage. See our waterproofing and home appraisal value guide.
What happens if the sump pump fails?
If the sump pump fails, water collected by the drainage channel has nowhere to go and will eventually back up and overflow onto the basement floor — defeating the entire system. This is the single most important reason a battery backup or water-powered backup sump pump is not optional, it is a required component of any interior drainage system in a home that cannot afford a wet basement. Power outages and pump failures most often occur during the same heavy storms that generate the highest water inflow. A battery backup activates automatically when the primary pump loses power or fails mechanically and can handle several hours of moderate inflow. See our backup power for sump pumps guide and battery vs water-powered backup guide.
Glossary of Interior Drainage Terms
Interior Perimeter Drain
A drainage system installed along the inside perimeter of a basement floor that intercepts groundwater entering through the foundation walls, cove joint, and sub-slab and routes it to a sump pump pit for ejection. The standard professional solution for wet basements in existing homes. Available in sub-floor, engineered channel, baseboard, and thin-floor configurations depending on foundation type.
Cove Joint
The seam where the basement floor slab meets the foundation wall, created because the two concrete elements are separate pours that never fully bonded. The single most common water entry point in basements because hydrostatic pressure from saturated soil pushes groundwater upward through this gap along the entire perimeter. Interior drainage systems are specifically designed to intercept water at the cove joint before it spreads across the floor.
Hydrostatic Pressure
The force exerted by water-saturated soil against a foundation wall and floor slab. As groundwater accumulates with no drainage path, pressure builds and forces water through cracks, the cove joint, and porous concrete. Interior drainage systems relieve hydrostatic pressure by giving groundwater a controlled path to the sump pit. Severe hydrostatic pressure can also cause floor heaving and wall bowing that requires structural evaluation beyond drainage. See our bowing basement walls guide.
Mud Zone
The area at the base of the foundation footing where soil, silt, fine sediment, and iron ochre accumulate over time. Traditional French drain pipe installed in this zone is in direct contact with soil and is the most prone to long-term clogging. Engineered channel systems like WaterGuard are specifically designed to sit above the mud zone on top of the footing, eliminating direct soil contact and significantly reducing clogging risk over a 25-plus year lifespan.
Monolithic Foundation
A foundation where the floor slab and footing are poured as a single continuous piece of concrete rather than as two separate pours. Common in homes built between approximately 1950 and 1970. Jackhammering through a monolithic floor to install a sub-floor drainage system would damage the footing, making baseboard-style surface-mounted systems the only safe interior drainage option for these foundations.
Weep Holes
Small holes drilled through the bottom course of concrete block foundation walls, typically 1 to 2 inches in diameter, to allow water trapped inside the hollow block cores to drain into the interior drainage system. Without weep holes, water inside hollow block walls can build up and exit through mortar joints or wall cracks higher up the wall rather than draining into the perimeter system at floor level.
Drain Tile
An older term for the perforated pipe used in interior and exterior drainage systems, originally made from clay tile sections laid end-to-end. Modern drain tile is perforated plastic — either corrugated flexible pipe or rigid PVC — often wrapped in a filter sock to reduce sediment intrusion. The term is still widely used by contractors and in building codes even though clay tile has not been installed in new construction for decades.
Wall Flange
A feature on engineered channel drainage systems where the top edge of the channel extends 3 to 8 inches up the basement wall to intercept water seeping down the wall face above the floor level. Critical for concrete block foundations where water drains through the hollow block cores and exits partway up the wall rather than only at the cove joint. Traditional French drain pipe installed below the floor does not capture this wall-face water without a wall flange.
Discharge Line
The pipe that carries water from the sump pump outlet to an exterior exit point away from the home. Should exit the foundation well above grade, extend at least 10 feet from the foundation, and discharge downhill or into a storm drain to prevent ejected water from re-entering the drainage system. Discharge line freezing in winter is a common cause of pump failure — freeze-resistant outlet covers or buried discharge lines below the frost line prevent this.
Transferable Warranty
A warranty from a waterproofing contractor that can be transferred to a future homeowner when the property is sold, typically for a nominal transfer fee. The most valuable type of warranty for a basement drainage system because it protects the buyer rather than expiring with the original homeowner. Engineered system brands including Basement Systems and their dealers commonly offer lifetime transferable warranties as a standard feature.
Related Guides
French Drain Cost
Full cost breakdown for yard and interior French drains.
Basement Waterproofing Cost
How much does basement waterproofing cost in 2026?
Interior vs Exterior Waterproofing
A deep dive into which method is best for your foundation.
Sump Pump Buying Guide
Everything you need to know to choose the right sump pump.
Best Sump Pumps 2026
Top-rated submersible and pedestal sump pumps reviewed.
Battery vs Water-Powered Backup Pumps
Which backup sump pump system is right for your home?
Best Vapor Barriers
Compare the best vapor barriers for basements and crawl spaces.
Backup Power for Sump Pumps
Generators, portable power stations, and battery backups compared.
French Drain vs Sump Pump
Which basement waterproofing system is best for you?
Complete Basement Waterproofing Guide
Everything you need to know about stopping basement leaks.
Get Expert Interior Drainage System Advice
Connect with certified basement waterproofing professionals in your area for a free assessment of your drainage needs.