Crawl space encapsulation is a comprehensive moisture control system that seals a vented crawl space from ground moisture and outside air by installing a continuous heavy-duty vapor barrier on the floor and walls, closing foundation vents, insulating the perimeter walls and rim joists, and maintaining controlled humidity with a dedicated dehumidifier. Unlike vented crawl spaces that rely on outside air circulation to manage moisture, an encapsulated crawl space is conditioned as part of the home's thermal envelope, eliminating the humid outdoor air that causes wood rot, mold growth, floor sagging, and pest infiltration in traditional vented designs. The system typically costs $3,000 to $15,000 professionally installed depending on crawl space size, existing conditions, and whether mold remediation or drainage is needed before encapsulation begins. A properly installed encapsulation system lasts 20 to 30 years, recoupts 70 to 90 percent of its cost at resale, and can reduce HVAC energy consumption by up to 20 percent by eliminating the largest source of uncontrolled air and moisture infiltration in most homes.
If you have a crawl space under your house that is always damp or musty, you are not alone. It can cause mold, sagging floors, and skyrocketing energy bills. Crawl space encapsulation seals off that area to keep out moisture, bugs, and cold drafts, turning it into a clean, controlled space that helps your home instead of hurting it.
In this guide we cover what encapsulation is, why it is worth it, how to do it step by step, what it costs, and tips on DIY versus calling in professionals. This is based on building codes like the International Residential Code (IRC) and real homeowner experiences.
What Is Crawl Space Encapsulation?
Instead of letting damp soil and outside air mess with your home's foundation, encapsulation seals everything up tight. It is more than just laying down plastic—it is a full system that includes:
- • A heavy-duty vapor barrier (10 to 20 mil) over the floor and up the walls
- • Closing off vents and plugging any gaps to make it airtight
- • Insulating the walls, rim joists, and sometimes the ceiling
- • A dehumidifier set to 45 to 50 percent humidity to pull out extra moisture
- • Sometimes a sump pump or humidity sensors for added peace of mind
It is perfect for homes with old-school vented crawl spaces, especially in humid or cold climates. In some areas, it can qualify for energy rebates.
Benefits of Crawl Space Encapsulation
Moisture & Mold Prevention
Stops wet air from rising up, preventing mold growth and musty smells from reaching your living space.
Better Indoor Air Quality
Seals out dust, radon, and allergens. Many homeowners see a noticeable drop in allergy symptoms.
Energy Savings
A sealed space means less work for your HVAC—up to 20 percent off energy bills, saving $200 to $500 per year.
Pest Prevention
Blocks easy access for mice, spiders, termites, and other crawl space invaders.
Structural Protection
Prevents wood rot and floor warping by keeping moisture away from joists and beams.
Home Value Boost
Looks great in inspections and often pays back 70 to 90 percent when you sell your home.
Pros and Cons of Crawl Space Encapsulation
Pros
- ✓ Built to last 20 to 30 years or more
- ✓ Cuts down on future repairs like mold removal
- ✓ Makes your whole house more comfortable and efficient
- ✓ Often comes with warranties (10 to 25 years)
- ✓ May lower your insurance premiums
Cons
- ✗ Not cheap up front ($1,500 to $15,000)
- ✗ Work can be messy and take 2 to 5 days
- ✗ Requires periodic maintenance on dehumidifier
- ✗ Very low or flooding spaces may need extra prep
How to Encapsulate a Crawl Space: Step-by-Step
The whole process usually takes professionals 2 to 5 days, or longer if you are going solo. Here is how it breaks down:
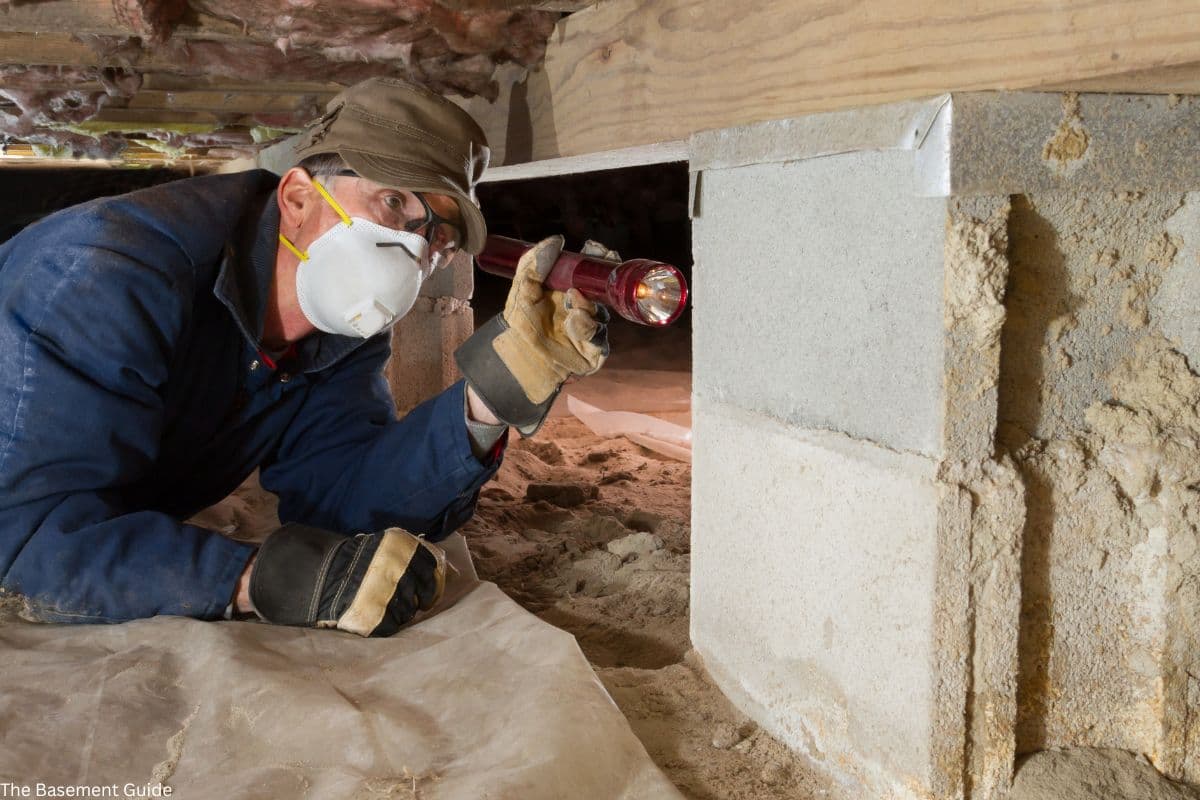
1. Inspection and Prep
Check for water spots, mold, bugs, or weak spots. Clear out junk, remove old insulation, and fix any leaks. A radon test is smart if you are in a hotspot area. This might run $100 to $300 but saves headaches later.
2. Lay the Vapor Barrier
Roll out a sturdy 10 to 20 mil polyethylene sheet over the dirt, pushing it up the walls and around posts by 6 to 12 inches. Overlap edges by a foot and seal them with tape or sealant.
3. Seal Up Vents and Gaps
Block exterior vents with foam or covers. Caulk around pipes, wires, and anything else poking through to make it airtight.
4. Add Insulation
Install rigid foam boards (R-5 to R-10) on walls and rim joists. Spray foam fills tricky spots and keeps things efficient.
5. Set Up Dehumidifier and Drainage
Install a quality dehumidifier set to 45 to 50 percent humidity with a drain line. Add a sump pump if water tends to collect in the space.
6. Final Touches
Add an access door, humidity sensors, and test everything for a day or two. If there is bad mold, clean it up first—that could add $1,000 to $5,000.
Crawl Space Encapsulation and Moisture Control with Mike Rowe
Crawl Space Encapsulation Cost Breakdown
Expect to pay around $5,500 on average, but it can range from $1,500 to $15,000 depending on your space's size and condition.
| Component | Average Cost | Details |
|---|---|---|
| Vapor Barrier Materials | $500 to $2,000 | 10 to 20 mil poly for about 1,000 sq ft |
| Insulation | $800 to $2,500 | Foam for walls and joists |
| Dehumidifier | $800 to $2,000 | Solid unit with auto-drain |
| Sump Pump (If Needed) | $500 to $1,500 | For spaces that get wet |
| Labor & Install | $2,000 to $6,000 | 2 to 5 days from experts |
| Mold Cleanup (Optional) | $1,000 to $5,000 | If mold is already present |
| Total Average | ~$5,500 | For a standard 800 to 1,200 sq ft area |
DIY vs Professional Encapsulation
DIY Approach
If you are handy and your crawl space is accessible, you can save $2,000 to $4,000 by doing it yourself. Total cost: $1,500 to $3,000 in materials.
However, it is hard work—crawling around in tight spaces, sealing everything perfectly. Mistakes can trap moisture instead of blocking it, and there is no warranty.
Professional Installation
Recommended for most homeowners. Pros bring expertise for a true seal, plus warranties (10 to 25 years). It costs more but you avoid the hassle and risks.
Search for local crawl space encapsulation companies and get at least 3 quotes from certified teams.
Best Materials and Recommendations
Vapor Barrier: Stego Wrap 15-Mil
Tough against tears, great for floors and walls
Insulation: Reflectix Foil-Faced Bubble Wrap
Reflects heat, easy to install
Dehumidifier: AprilAire E080
Covers up to 2,200 sq ft, super reliable
Sump Pump: Zoeller M53
Quiet and powerful for drainage
Seam Tape: Nashua 322
Sticks strong, waterproof
Maintenance After Encapsulation
Check the Dehumidifier Monthly
Dump water if needed, clean filters, and make sure it is running. A professional tune-up runs $100 to $200 per year.
Annual Inspection
Crawl in or hire someone to spot rips in the barrier, water intrusion, or pest activity through the access door.
Track Humidity
A cheap hygrometer keeps tabs on moisture levels. Aim for under 50 percent relative humidity at all times.
Test the Sump Pump
Every few months, dump some water in to see if it kicks on. Replace the battery backup annually.
Frequently Asked Questions
What is crawl space encapsulation?
Crawl space encapsulation is the process of converting a vented crawl space into a conditioned, sealed space by installing a continuous vapor barrier on the floor and walls, closing foundation vents, insulating the perimeter walls and rim joists, and installing a dehumidifier to maintain controlled humidity. The goal is to eliminate the humid outside air that enters through foundation vents and causes wood rot, mold, floor sagging, and energy loss. Encapsulation treats the crawl space as part of the home's conditioned envelope rather than as an exterior space, which is the fundamental shift that makes it effective where traditional vented crawl spaces fail in humid climates.
How much does crawl space encapsulation cost?
A professionally installed encapsulation system costs $3,000 to $15,000 for a typical 800 to 1,200 square foot crawl space, with a national average around $5,500. Vapor barrier materials run $500 to $2,000, insulation adds $800 to $2,500, a quality dehumidifier costs $800 to $2,000, and labor runs $2,000 to $6,000 for a 2 to 5 day installation. If mold remediation is needed before encapsulation, add $1,000 to $5,000. DIY installation of materials only runs $1,500 to $3,000 but requires working in a tight confined space and getting every seal correct. Get at least three quotes from certified crawl space contractors and confirm what is included in each scope.
Is crawl space encapsulation worth it?
For homes in humid climates or with any history of crawl space moisture, mold, musty odors, or floor sagging, yes. Encapsulation eliminates the source of those problems rather than treating symptoms. Energy savings of 10 to 20 percent on heating and cooling bills are common, representing $200 to $500 per year depending on your climate and home size. The system recoups 70 to 90 percent of its cost at resale and is a positive line item in home inspections. Homes with a vented crawl space in a humid climate are typically spending money on repeated repairs to flooring, joists, and HVAC systems that encapsulation would have prevented.
Does crawl space encapsulation require closing the foundation vents?
Yes, closing foundation vents is a core part of encapsulation. Vented crawl spaces were standard practice for decades based on the theory that outside air would dry the space, but in humid climates the opposite happens: warm humid outside air enters the cooler crawl space, condenses on cool surfaces, and deposits moisture directly onto joists and the vapor barrier. Closing the vents and sealing the space eliminates this source of moisture entirely. Most modern building codes now permit or require unvented conditioned crawl spaces. Check with your local building department, as some older code jurisdictions still require vented designs.
What thickness vapor barrier do I need for crawl space encapsulation?
A minimum of 10 mil polyethylene is required for a functional encapsulation system, with 12 to 20 mil recommended for durability in spaces where foot traffic or stored items may contact the barrier. Thicker barriers resist puncture from rocks, debris, and normal access activity. Reinforced barriers with scrim layers provide the best combination of thickness and tear resistance. Standard 6 mil poly sheeting used in basic moisture control is not adequate for a true encapsulation system. Products like Stego Wrap 15 mil are the contractor standard for full encapsulation. The barrier must cover the entire floor and run up the walls at least 6 inches, with all seams overlapped by 12 inches and sealed with compatible tape or sealant.
How long does crawl space encapsulation last?
A properly installed encapsulation system lasts 20 to 30 years or more. The vapor barrier itself is rated for 25 years under normal conditions. The dehumidifier requires the most maintenance and typically lasts 8 to 12 years before motor replacement. The rigid foam insulation and vent covers are essentially permanent. Most professional installations include a 10 to 25 year warranty on the encapsulation work. Annual inspections to check for barrier tears, pest intrusion, and dehumidifier function are the primary ongoing maintenance requirement. A system that is inspected and maintained annually will consistently outperform its rated lifespan.
Can I encapsulate a crawl space myself?
DIY is possible for homeowners comfortable working in confined spaces who can execute every step correctly. The work involves thorough cleaning and debris removal, careful vapor barrier installation with properly sealed seams and wall coverage, vent sealing, rigid foam insulation on walls and rim joists, and dehumidifier installation with a drain line. The most common DIY failures are incomplete seam sealing, insufficient wall coverage, and missing air sealing at rim joists and penetrations. Any gap in the system allows moisture to enter. Professional installation at $3,000 to $8,000 in additional cost comes with a warranty and the experience to identify and seal every penetration correctly. DIY is appropriate for straightforward accessible spaces; call a professional for low-clearance, wet, or mold-affected crawl spaces.
Glossary of Crawl Space Encapsulation Terms
Vapor Barrier
A polyethylene sheet installed on the crawl space floor and walls to block ground moisture from evaporating into the space. Rated by thickness in mils (thousandths of an inch). A minimum of 10 mil is required for encapsulation, with 12 to 20 mil recommended. Must cover the entire floor and extend up all walls with sealed overlapping seams to form a continuous moisture barrier.
Encapsulation
A complete crawl space moisture control system that seals the space from ground moisture and outside air using a continuous vapor barrier, closed foundation vents, perimeter wall insulation, and a dehumidifier. Converts a vented crawl space into a conditioned space that is part of the home's thermal envelope. More comprehensive than a basic vapor barrier installation.
Rim Joist
The horizontal board that sits on top of the foundation wall and closes off the ends of the floor joists. A primary air and moisture infiltration point in crawl spaces because it is at grade level and often poorly insulated or sealed. Insulating and air sealing rim joists with rigid foam or spray foam is a required component of effective crawl space encapsulation.
Stack Effect
The natural movement of air through a building where warm air rises and exits through the upper floors and roof, drawing replacement air in from below through the crawl space, foundation vents, and any gaps in the floor assembly. In a vented crawl space, the stack effect pulls humid crawl space air directly into the living space above, distributing moisture, allergens, and radon throughout the home. Encapsulation breaks the stack effect at the crawl space level.
Conditioned Crawl Space
A crawl space that has been sealed, insulated, and integrated into the home's thermal and moisture control envelope rather than being treated as an exterior vented space. Maintained at controlled temperature and humidity by the home's HVAC system or a dedicated dehumidifier. The end state of a properly executed encapsulation project.
Mil
A unit of thickness equal to one thousandth of an inch, used to rate vapor barrier thickness. A 10 mil barrier is 0.010 inches thick. Thicker barriers resist puncture and abrasion better than thinner ones. Standard construction poly sheeting is typically 4 to 6 mil, which is insufficient for encapsulation. Encapsulation-grade barriers run 10 to 20 mil, with reinforced scrim-laminated products at the high end.
Foundation Vents
Screened openings in the foundation wall of a vented crawl space designed to allow outside air to circulate through the space. Standard practice in residential construction through most of the 20th century. Now understood to worsen moisture problems in humid climates by introducing warm humid air that condenses on cool crawl space surfaces. Closed and sealed as part of encapsulation.
Related Guides
Basement vs Crawl Space vs Slab
Compare the three foundation types and what each means for moisture control and finishing.
Best Vapor Barriers
Top-rated vapor barrier products for crawl spaces and basements compared.
Complete Basement Waterproofing Guide
How crawl space encapsulation fits into a whole-home moisture control strategy.
How to Prevent Basement Mold
Mold prevention strategies that apply equally to crawl spaces and basements.
Basement Insulation Guide
Insulation types, R-values, and correct assemblies for below-grade spaces.
Sump Pump Buying Guide
Choosing the right sump pump for crawl spaces with drainage issues.
Mold Remediation Cost
What remediation costs if mold is present before encapsulation begins.
Radon Testing and Mitigation
Why radon testing before encapsulating a crawl space matters.
Final Advice
Crawl space encapsulation is one of those upgrades that just makes sense for a more comfortable, healthier house. Check your space for moisture signs, then decide if DIY or professional installation fits your situation. The energy savings and peace of mind are worth the investment.
For more on keeping moisture in check, see this DOE guide on vented and unvented crawl spaces.